This post was originally stored as a draft I never finished on how to update Windows 8 to Windows 8.1 Update 1 with the least amount of downloads (and time). Before I got around to publish it, Windows 10 was released. So now it will take you all the way from Windows 8 through Windows 8.1 to Windows 10.
As many of you know, Microsoft has released Windows 10 as a free upgrade if you have a legal Windows 7 or 8.x installation, as long as you upgrade during the first year (so by 29th of July 2016).
To upgrade Windows 8 to Windows 10 you have to first upgrade to Windows 8.1. So lets get cracking. I assume you have a clean new Windows 8 ("Home" or Pro) installed.
To upgrade to Windows 10 (free upgrade during the first year of release) you need to have Windows 8.1 installed; se above. I have not tried from Windows 7 directly to Windows 10.
As many of you know, Microsoft has released Windows 10 as a free upgrade if you have a legal Windows 7 or 8.x installation, as long as you upgrade during the first year (so by 29th of July 2016).
To upgrade Windows 8 to Windows 10 you have to first upgrade to Windows 8.1. So lets get cracking. I assume you have a clean new Windows 8 ("Home" or Pro) installed.
Shortest path to upgrade from Windows 8 to Windows 8.1
- First, activate Windows 8.
- Then configure Windows Update to "Let me decide which updates to download and install"
- Check for Windows 8 updates. Windows will want to update the Windows Update Component itself. Update it.
- Install the only update you need to get Windows 8.1: 'Update for Windows 8 for x64-based Systems (KB2871389)'. Reboot.
- When Windows boots, log in and open Windows Store and click "Update to Windows Update 8.1 for free". Let the process upgrade your computer to Windows 8.1 (this takes a while - downloading, applying, setting up, getting ready.. grab some lunch or something while it downloads and installs)
You can also get the update KB from Microsoft directly: https://www.microsoft.com/en-us/download/details.aspx?id=40098
To upgrade to Windows 10 (free upgrade during the first year of release) you need to have Windows 8.1 installed; se above. I have not tried from Windows 7 directly to Windows 10.
Shortest path from Windows 8.1 (resume from my steps above) to Winows 10
- Make sure Windows Updates are configured only to check and not to download updates.
- Install the only updates you need to get Windows 8.1:
- 'Update for Windows 8 for x64-based Systems (KB2976978)'. Windows Compatibility
- 'Update for Windows 8 for x64-based Systems (KB3035583)'. This installs the 'Get Windows 10 App'..
- Reboot
- You should now see the Get Windows 10 app icon in the tray bar. Right click and select 'Get Windows 10'. Then click on 'Reserve your free upgrade'
- Since Windows 10 is released in stages to groups of computers, you can, as this is written, speed things up by downloading the Windows 10 Media Creaton Tool here: https://www.microsoft.com/en-us/software-download/windows10
- Run the tool and select 'Create installation media for another PC'. This will download the Windows 10 ISO of your chosing (I use "US English" and 64-bit).
- I did not have any luck with the 'Upgrade this PC now' option on the laptop I used to create this guide, but I've used it on another computer just fine. Anyway, I prefer having the ISO for later, and if the 'upgrade this pc' doesn't work you have to download the file again... thats 3GB+ and thats no fun unless you are on 100Mbps+
- When the Windows 10 ISO has been downloaded, right click on it and select 'Mount'
- Navigate to the Virtual DVD-ROM and start 'setup.exe' in the root of that drive.
- I would recommend you select 'Download and install updates (recommended)' (fig. 1)
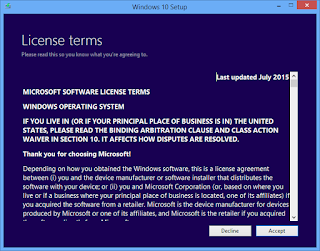
- Let it get ready (fig. 2) and accept licencing (fig. 3)
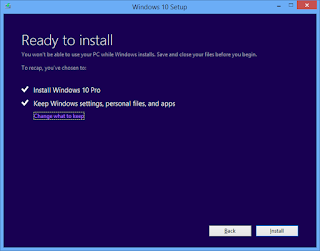
- If you want to keep your files and apps (who wouldn't?) leave the defaults (fig. 4) when it's ready to install
- Click install and after some time and restarts (fig. 5) you should have a shiny Windows 10 on your computer (fig. 6 & 7)
 |
 |
| Fig. 1 | Fig. 2 |
 |
 |
| Fig. 3 | Fig. 4 |
 |
| Fig. 5 |
 |
 |
| Fig. 6 - Welcome to Windows 10 | Fig.7 - Windows 10 desktop, start menu is back yeayh! |
I will probably follow up with a new post on some of my initial configuration tips, in regards to privacy concerns and other settings from Microsoft I don't think is good. I will how ever end this post with one tip:
How to delete the Windows 8 backed up OS files
Windows 10 lets you downgrade to Windows 8.1 during the first month. If that's not an option, you can go about and delete the backed up Windows 8.1 OS files. This however is not done with a simple "delete folder" in Windows Explorer, as the files are protected.
Here's how:
- Press 'Win + S' to search and type 'Cleanup'
- Select 'Disk Cleanup' app (start the app)
- When the app starts, click on 'Clean up system files' button. (Need to be administrator or have the admin password)
- You will now have an option in the 'Files to delete' list called 'Previous Windows installations'. Select this, and other options if you like, and click OK. This will wipe away the old Windows 8.1 backed up OS files - not your documents or data.
Thats it. A new Windows 10 computer from your old Windows 8 (or 8.1).
When you have upgraded once, you should actually be able to do a clean Windows 10 only install (without upgrades). So it's a good thing to download the ISO as I said in the first place. Please note that you have to do the upgrade once.
Hope this was useful for some of you.
When you have upgraded once, you should actually be able to do a clean Windows 10 only install (without upgrades). So it's a good thing to download the ISO as I said in the first place. Please note that you have to do the upgrade once.
Hope this was useful for some of you.
Comments